Armor Overview

Master the art of tank warfare in Hell Let Loose

Getting Started

Essential fundamentals and beginner-friendly tips for new tank crews.

Identification

Learn to identify enemy tanks at a glance and understand their capabilities.

Calculators & sights

Artillery and SPA mill calculators, plus armor sight practice for distance reads.

Community

Connect with other tank crews, share strategies, and join the community.

New tanker tries our tactics

Putting Armor Hub fundamentals into practice in a real match

World War 2 armor in real life

Historical armored vehicles and how they compare to the game

Tank Database

Complete guide to all tanks in Hell Let Loose

Data as of U19.1

Tank Type

Tank Comparison

Select First Tank

Click a tank tile to compare

VS

Select Second Tank

Click another tank tile to compare

Calculators & sights

Artillery, SPA, and tank optics — mills, tools, and sight practice

Artillery Calculator

No calculation performed yet

Saved Results

Result Distance Faction Action
No calculations saved yet

SPA Calculator

+ adds mills to the solution; − subtracts (terrain angle and tank pitch).

No calculation performed yet

Saved Results

Result Distance SPA Type Action
No calculations saved yet

Armor Sights

Select Tank for Scope View

Choose any tank from the available factions to view its scope image with ranging markers. This tool helps you practice estimating distances using tank sights.

Note: These sights are based on AP rounds only. These were tested in 1440p and 115 FOV.

How to Use:
  • Select a faction to filter tanks
  • Click on any tank to open its scope view
  • Click on the scope image to add ranging markers
  • Markers appear every 100m for distance estimation
  • Use this to practice ranging in-game

Tank Identification Guide

Learn to identify tanks quickly and accurately

Practice Identification

Identification Tips

  • Look at the silhouette and overall shape
  • Check the turret design and gun barrel
  • Observe the suspension and track system
  • Note the engine deck and exhaust
  • Pay attention to the commander's cupola
  • Count the road wheels and their spacing
  • Identify the main gun caliber and length
  • Look for distinctive markings or camouflage
  • Check the presence of side skirts or armor
  • Note the overall size and proportions

Select Difficulty:

Tank to identify

Getting Started in Tanking

Essential fundamentals and beginner-friendly tips for new tank crews

Essential Tutorial Videos

Tank Basics

Learn the fundamentals of tank warfare

Combat Guide

Advanced combat strategies and tactics

Essential Fundamentals

Tanker Roles

Understanding the roles and who does what

Tank Commander Icon
Tank Commander - The "Squad Leader" of the tank crew. This individual can spot and mark things on the map. They can play any role in the tank, but is recommended to play as the spotter as they are typically pre occupied by communicating to other squad leaders on the team & marking targets on the map. The Tank Commander role has two sub classes. One with a sub machine gun and one with a pistol and repair torch. Personally, I recommend the submachine gun as it's able to combat most satchels if timed correctly.
Tank Crewman Icon
Tank Crewman New in U19
The tank crewman are simply the "other two" squad mates in a tanker squad. These crewman can also play any role in the tank however it is recommended that they play as driver or gunner. This said, there is no true method these are simply recommendations. You should play whatever role you and your tank mates decide as teamwork and comfortability is the ultimate deciding factors. This role comes with two sub classes. The starting unit comes with no repair torch, and the second one (once you earn level three) gets the repair torch. In ever single scenario you should always equip the repair torch class.

Update 19: Crewmen have now gained a supply crate that they can drop for the mechanic to build.

Tank Technician Icon
Tank Technician New in U18
The Tank Technician is a new role that allows the tanker subclass to now build support assets for armor. The Technician (unlocked at level 7 crewman) can now build four barricades (25 supplies each), one repair station (50 supplies each), and one tank ammo depot (50 supplies each). These can utilize existing supplies across the battlefield to support your armor units.

Artillery Roles U19.1

The artillery squad uses three in-game roles aligned with Update 19.1 (Artillery Observer, Operator, Gunner). Per-role equipment, subclasses, and full ability notes will be expanded in a later pass.

Artillery Observer Icon
Artillery Observer — Squad leader for the artillery unit. Acts as the link between command chat and the gun line. While able to work from an SPA, the Observer is often strongest on the front line calling targets, directing fire, and marking with the flare gun.
Artillery Operator Icon
Operator — Artillery squad crew role (replaces the former Artillery Engineer naming in-game as of U19.1). Works with the Observer and Gunner to run static pieces and SPA. Detailed loadout and subclass breakdown TBD.
Artillery Gunner Icon
Gunner — Artillery squad crew role (replaces the former Artillery Support naming in-game as of U19.1). Works with the Observer and Operator on fire missions and crew-served weapons. Detailed loadout and subclass breakdown TBD.

Health Management

Monitor all four health bars - each affects combat capability in critical ways.

U18 Update: Damage is now modular. Tankers must repair each component individually by looking at it and starting repairs. Repair stations prioritize components as they always have, starting with tracks.

Hull Icon
Hull

This is considered the overall health of the tank. Use this to gauge how much health your vehicle has.

Turret Icon
Turret

A damaged turret will slow the rotation of the gun, as well as prevent the use from your coaxial machine gun if your tank has one.

Engine Icon
Engine

CRITICAL COMPONENT! Once this goes down your engine will begin smoking and the tank will turn off. To restore this, you must repair the engine back to 100% and then turn over the tank again to start moving.

Tracks Icon
Tracks

Damaged tracks limit the mobility of the tank, however are not fully crucial. The tank can still move and spin fully but will remain stuck in first gear.

Tank Types

Understanding the different tank classifications and their roles on the battlefield.

SPA Icon
SPA (Self Propelled Artillery)
New in U19

The SPA or Self propelled artillery units have been newly introduced to Hell Let Loose. These are designed to be used as "bunker busters" and can be shot at ranges up to 600 meters. The rounds will arc similar to artillery in mid air and will land on target. You can click here to help you range.

Heavy Tank Icon
Heavy Tank

The backbone of armored warfare. Heavy tanks provide superior armor protection and firepower, making them ideal for breakthrough operations and engaging enemy armor at long range.

Medium Tank Icon
Medium Tank

Balanced combination of mobility, armor, and firepower. Medium tanks excel at supporting infantry advances and providing mobile firepower across various terrain.

Light Tank Icon
Light Tank

Fast and agile reconnaissance vehicles. Light tanks prioritize speed and mobility over armor, making them excellent for scouting, flanking, and hit-and-run tactics.

Recon Vehicle Icon
Recon Vehicle

Specialized reconnaissance and support vehicles. These units excel at gathering intelligence, providing fire support, and maintaining battlefield awareness. The spotter position can activate a recon ability to spot enemies in a large area.

Infantry Weapon Damage (vs Tanks) - Update 19 Changes

Know your enemy's firepower to assess threats and prioritize targets:

Rocket Launchers

Approx. 330 damage per hit

High Threat - Shots to Kill:

  • 4 shots to kill Heavy tanks
  • 3 shots to kill Medium tanks
  • 2 shots to kill Light tanks

Note: New in U19- All launchers now do the same damage and can pen the front of all mediums. The bazooka has been brought in line with other launchers.

AT Rifles

Approx. 64 damage per hit

Medium Threat - Shots to Kill:

  • 19 shots for Heavy tanks
  • 15 shots for Cromwell Mk.IV
  • 14 shots for Medium tanks
  • 10 shots for Light tanks
Anti-Tank Mines

Approx. 600 damage per hit

Extreme Threat - Shots to Kill:

  • 2 shots to kill Heavy tanks
  • 2 shots to kill Medium tanks
  • 1 shot to kill Light tanks

Always Peek Cover

Position your tank so only the turret is visible (Hull down), or peek cover to where you can back up quickly.

  • Use terrain to better ricochet, as the higher you are the easier it is to bounce shots
  • Keep hull behind cover and only expose turret if possible
  • Use reverse to quickly escape if you get shot first

Survivability & Positioning

Never stay out in the open, always have an escape route.

  • Always be moving from cover to cover
  • Have a quick escape route by either quickly moving forward in first gear (especially with the panther) or quickly reversing (Tiger I, 76 Jumbo) depending on which gears work quicker on your respective tank
  • Ensure you always prioritize other armor, despite what blueberries run up and tell you. You cannot survive if armor is not subdued first
  • You have a big gun, use it for range. You cannot turn around fast enough in a fight, but you can the further away you are

Communication & Coordination

Master crew communication and team coordination for maximum combat effectiveness.

  • Maintain constant crew communication
  • Coordinate with other tank crews
  • Use proper radio protocols
  • Share intelligence and positions

Pro Tips from BEER Clan

  • Communication Tactics: Often times people will be overcommited to "legit" tank coms.. but the reality is this is a game and sometimes simple is better, especially for "new" tankers or tankers that you havent played with. Starting off with "gunner/driver/spotter" followed by a clock direction (12-front, 6- back etc). This will help with basic orientation. Driver commands can be called out as "ass back right" or "ass back left" for easy orientation. This tip is 100% up to you and whatever your crew jives with so be sure to see what works best for your crew!
  • Focus the Hull.. ALWAYS: Unlike War Thunder or Squad 44, Hell Let Loose uses simplified damage - focus on hitting the hull for maximum effectiveness
  • Engine Positioning: Keep engine compartment protected - rear hits can leave you stranded and unable to restart
  • How to Ricochet: Peak the front of your tank out of cover at a 30 degree angle to increase the likelihood of a ricochet. Your tank being higher than another tank can also increase this likelihood
  • The Smoke Trick: Use smoke for retreating or attacking, don't forget you can ping THROUGH the smoke! ▶ Watch Demo
  • Retreat Timing: Know when to disengage - survival and repositioning beats dying for a single kill

How to be a Good Driver

more

Join Draft Haus Community

Connect with fellow tankers and support this guide

Draft Haus

A military-themed gaming community focused on Hell Let Loose and tactical gameplay. Join our Discord to connect with fellow tankers, play on our dedicated server, and support this comprehensive armor guide.

Join Our Discord
🎮

Hell Let Loose Server

Play on our dedicated HLL server with custom settings, active admins, and a friendly community of tank enthusiasts.

👑

VIP Access

Get VIP status by subscribing within our discord. Skip the queue to the Draft Haus HLL server. You can also become a VIP by helping us seed the server for FREE!

🏆

Community Events

Participate in tank tournaments, competitive matches, and community events organized by Draft Haus.

Featured Content Creators

Check out our community's top Hell Let Loose content creators for gameplay, tutorials, and tank warfare guides!

RazBora

Tank Specialist

Expert tank gameplay, advanced tactics, and comprehensive Hell Let Loose tutorials. Master the art of armored warfare with detailed guides and high-level gameplay.

TheFreshBakedGoods

Tutorial Master

In-depth Hell Let Loose tutorials, strategic gameplay analysis, and comprehensive guides for both new and experienced players. Learn from the best!

sushiicatt

Streamer

Hi! My name is Amelia, but I get called sushii a ton! I'm currently 22 years old and living in the Netherlands! I'm a huge cat lover and a HUGE metal head who loves to attend concerts. Please recommend me bands, love to have a chat with fellow metal heads. I love to make people laugh and genuinely have a good time altogether!

makL_

Streamer

Hey! My name is Mike aka makL. I'm a punk rocker that likes to play games. I also like talkin bout books and movies especially ones from the 80s. I drink and I curse so it aint kid friendly in here.

Data contributions by Yuh and Wix

Infantry overview

Getting started? Try one of these

Role guides

Rifleman guide

learn to play the rifleman role

Anti-tank guide

be the bane of armor

Commander guide

learn to control the battlefield

Getting started

If you're just getting into Hell Let Loose, start here.

Finding a server

To find a server, use the Enlist button on the Hell Let Loose main menu. That opens the server browser, where you can browse listings and filter by region, player count, map, and more. The most important thing for maximizing your experience, though, is playing on community servers.

Community servers are run by groups who care about their regulars. They almost always have a team of admins (often tied to a Discord), clear rules, seeding expectations, and someone you can ping when something breaks or a player is out of line. That makes them a strong choice when you want a stable place to learn and squad up - and it keeps your experience as consistent as possible.

Avoid official servers. Although the name sounds official and these are from Team 17 themselves, they do not have active admins. That allows for rampant team killing, throwing, hacking, and similar behavior with no reliable way to counter it in the moment.

On PC, if you want a home server with active staff and a tactical crowd, try Draft Haus (search the browser for Draft Haus). It’s the official server of Armor Hub and the first home of Armor Only Events. Draft Haus regularly seeds and hosts events - so if you’d like to be featured in videos, hang out with cool people, or just say hello, stop by. You can join the Discord here, and read more in Armor Hub’s Draft Haus section.

Game modes

Knowing the mode tells you where the fight will move next - which is half of “where are the enemies?” Below: how each mode is won and how capturing actually scores.

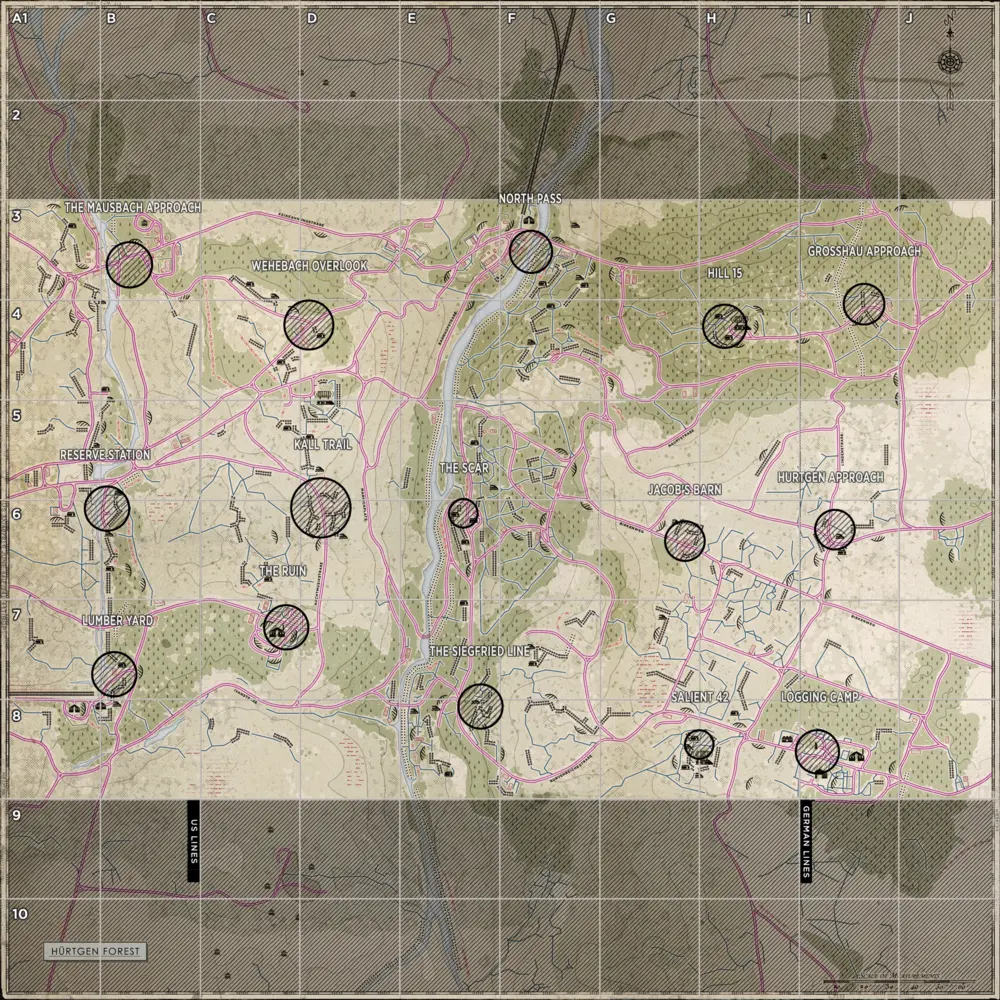
  • Warfare - Both teams fight over the center objective at the start; it begins neutral. After the first cap, two objectives are always active at once. Your job is to attack the enemy’s objective or defend yours as the line moves.

    Win condition: Hold the center objective before time runs out, or capture all five objectives and push the enemy team off the map.

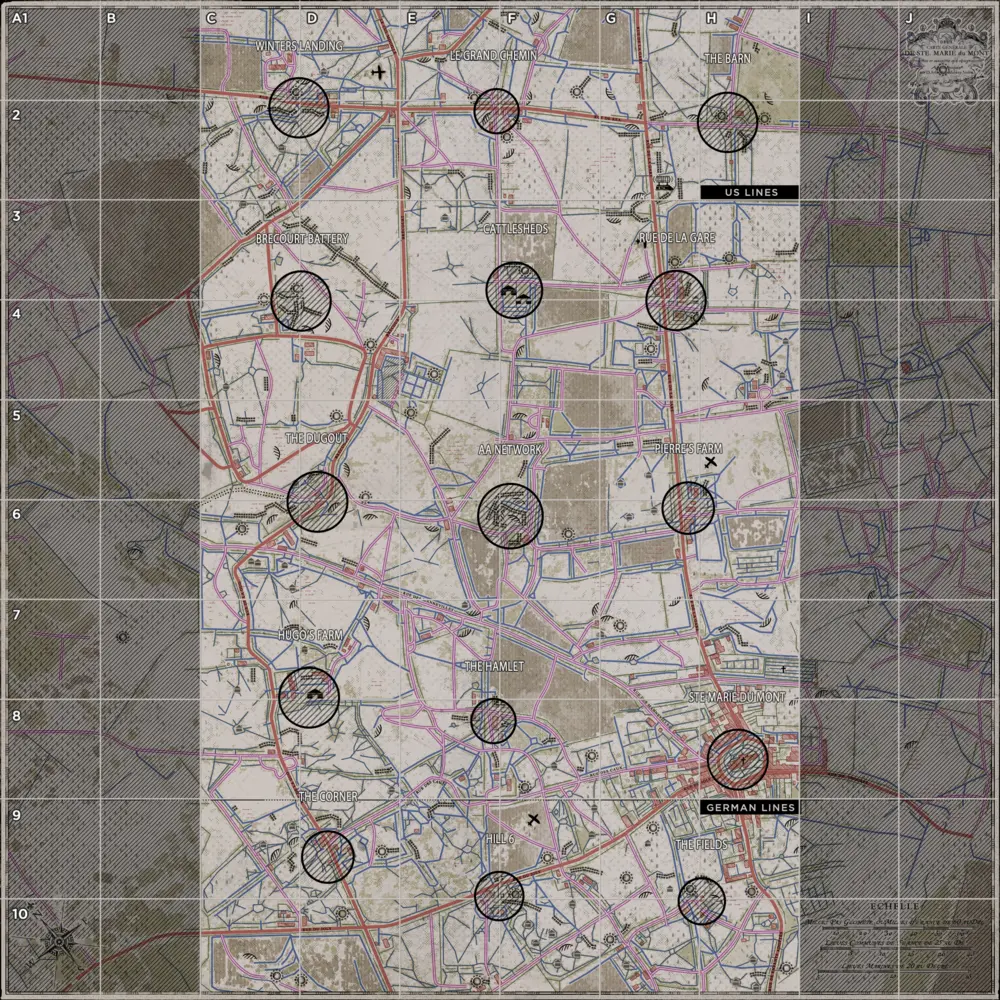
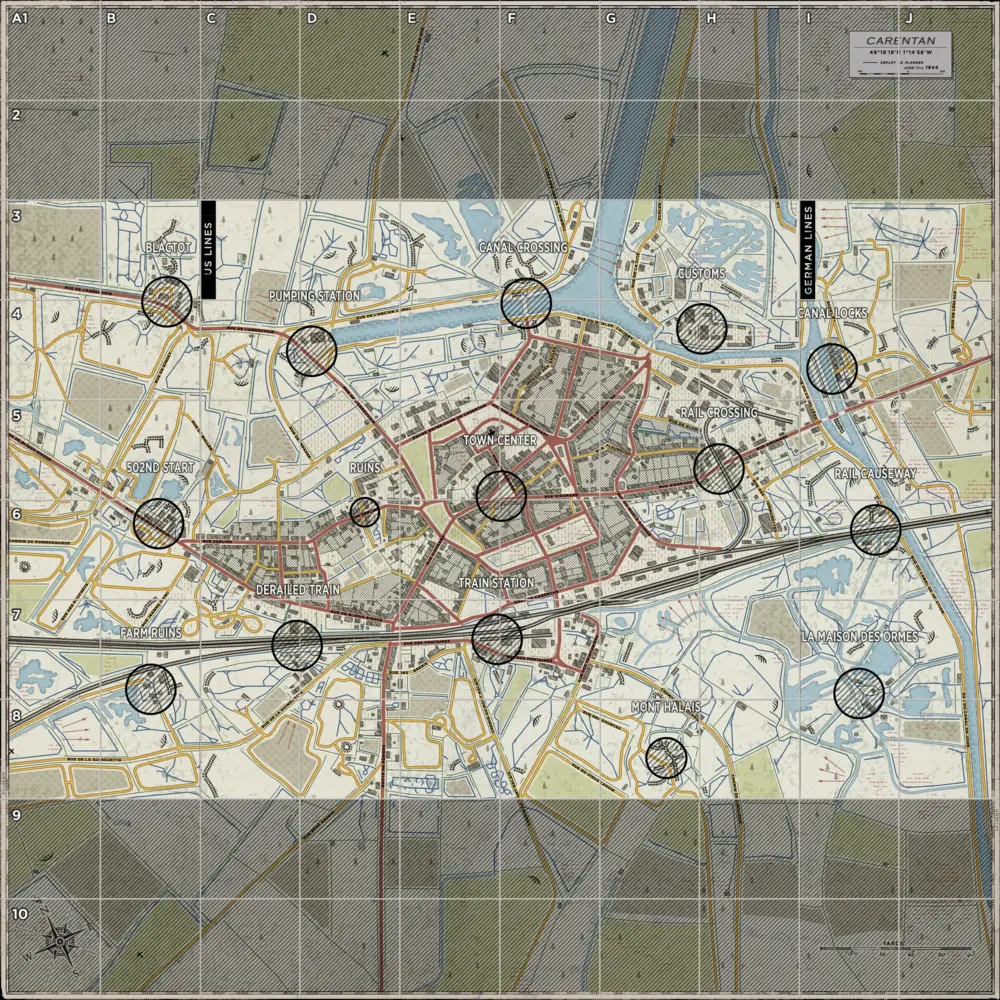
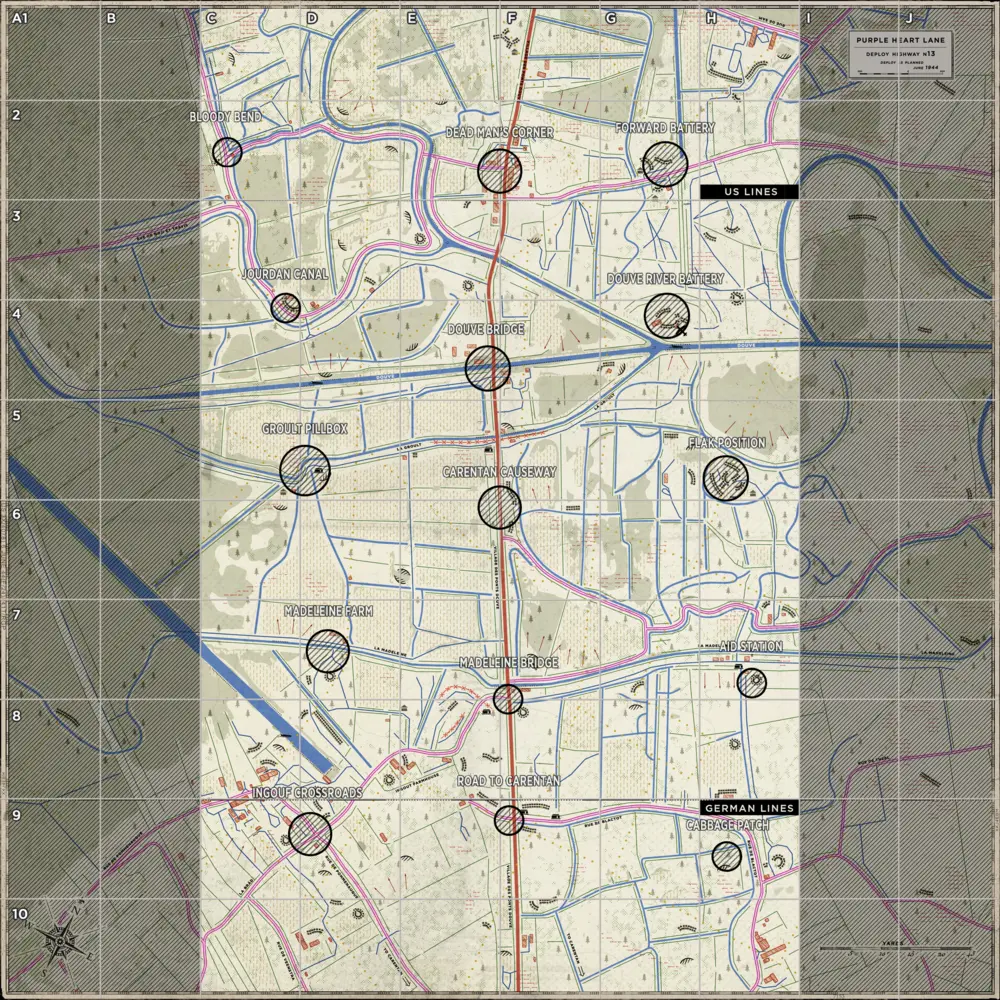
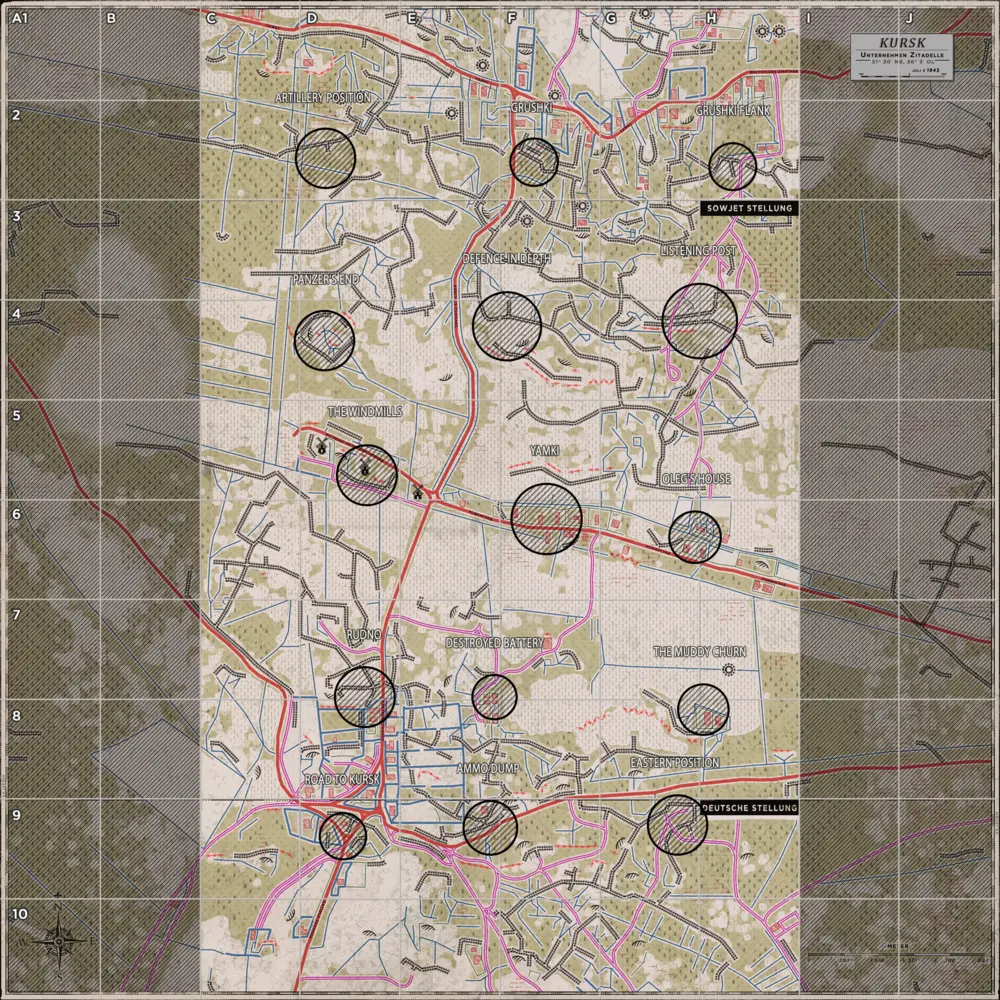
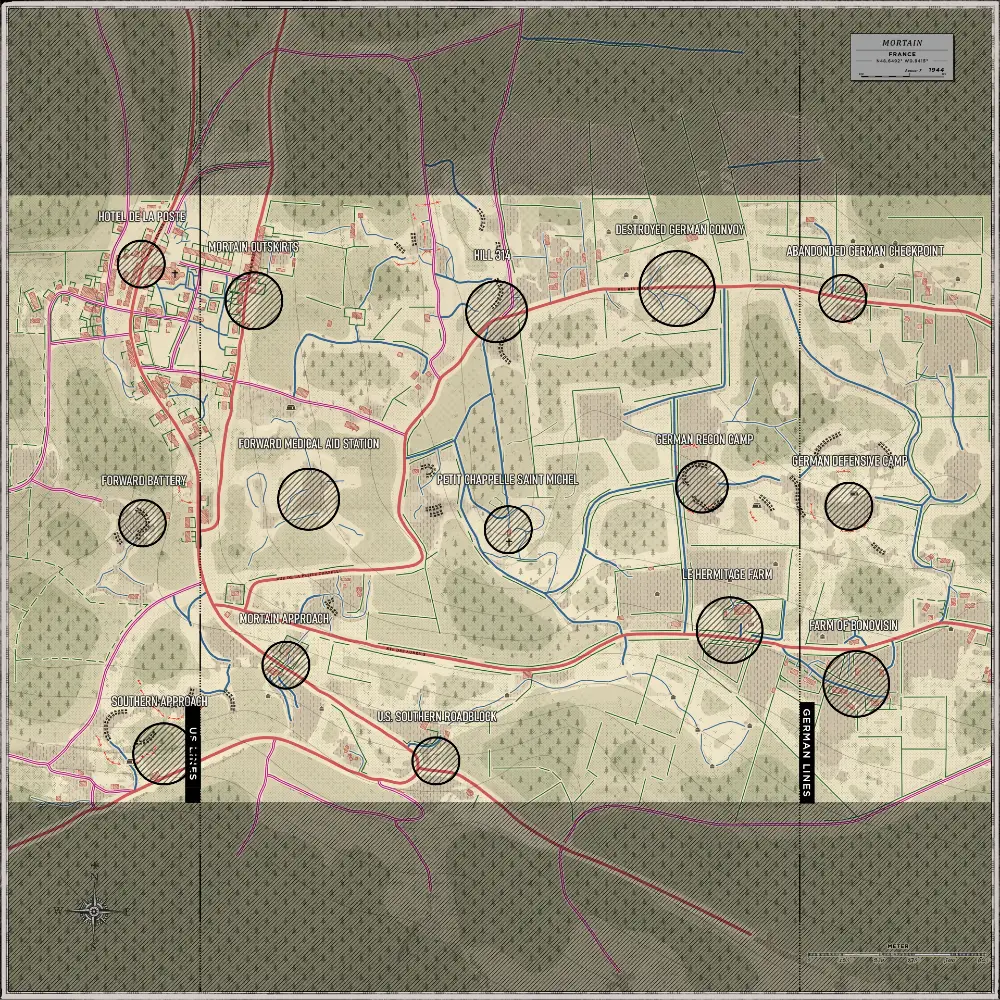
    Capturing: A point takes two minutes to flip at minimum - it cannot be captured faster than that; defenders can only slow or stall progress, not speed the attacker’s tick. The capture zone is the four squares around an objective: one player = one capture weight in that ring. Inside the strongpoint (the black circle), each player counts as three capture weight.

  • Offensive - One attacking team and one defending team. Only one objective is active at a time, and the sector can flip in 30 seconds (unlike Warfare’s longer tick).

    Win condition: Attackers must capture all five objectives before their timer runs out. If the timer hits zero, the match doesn’t end on the spot - it continues until the attackers’ manpower is fully exhausted; if manpower is still left, the game can enter overtime. Defenders win by holding any objective until the timer is exhausted.

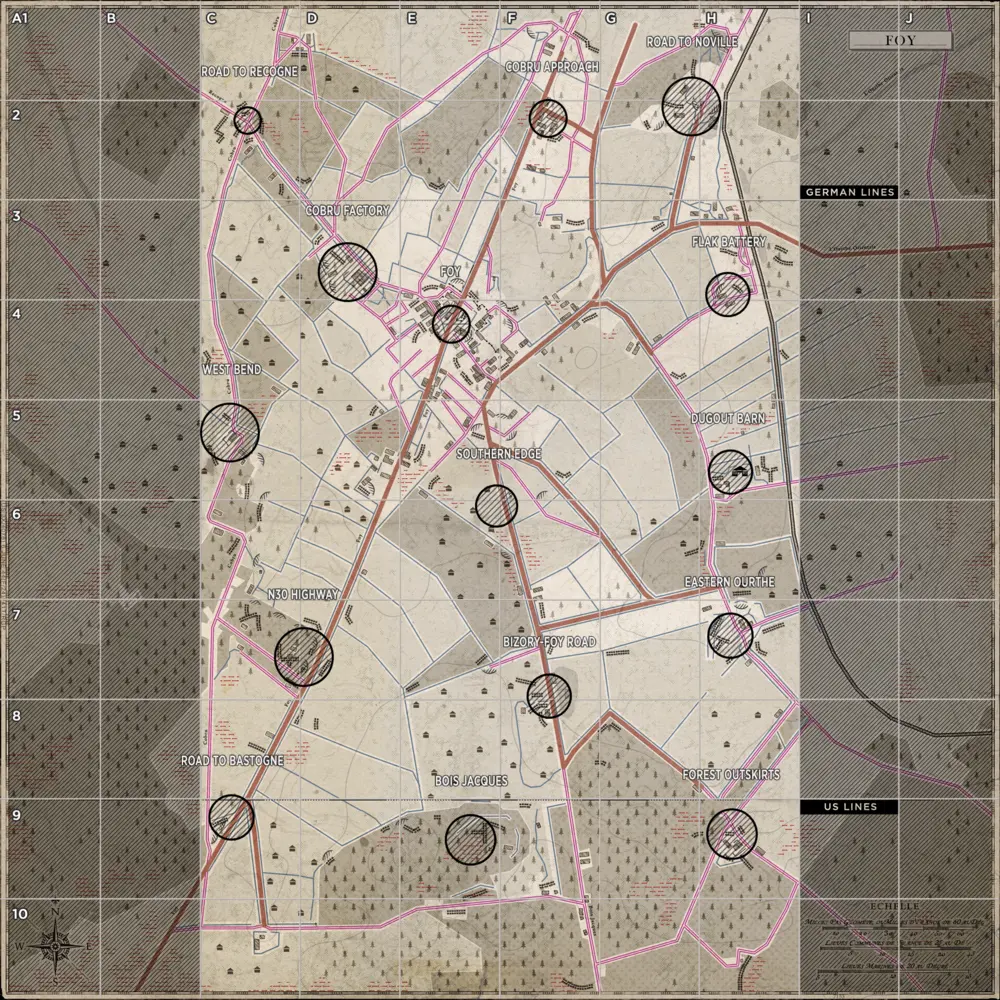
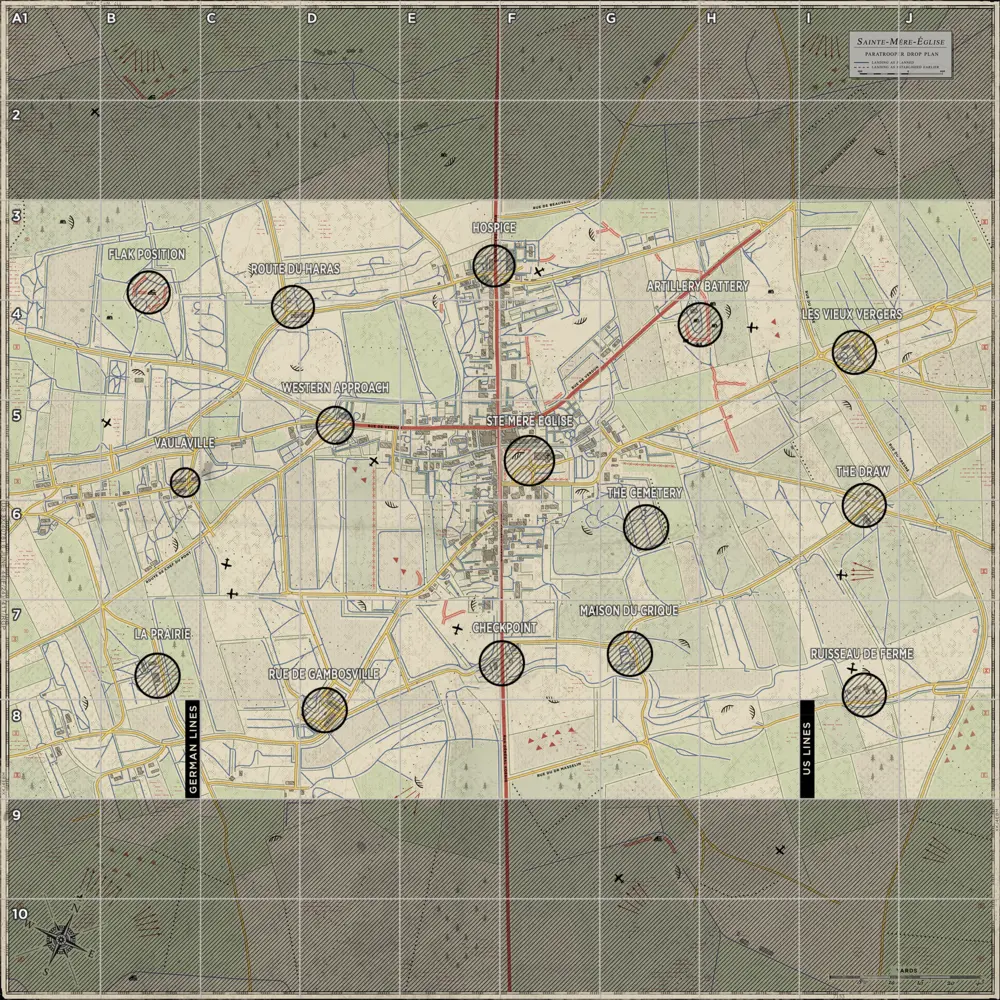
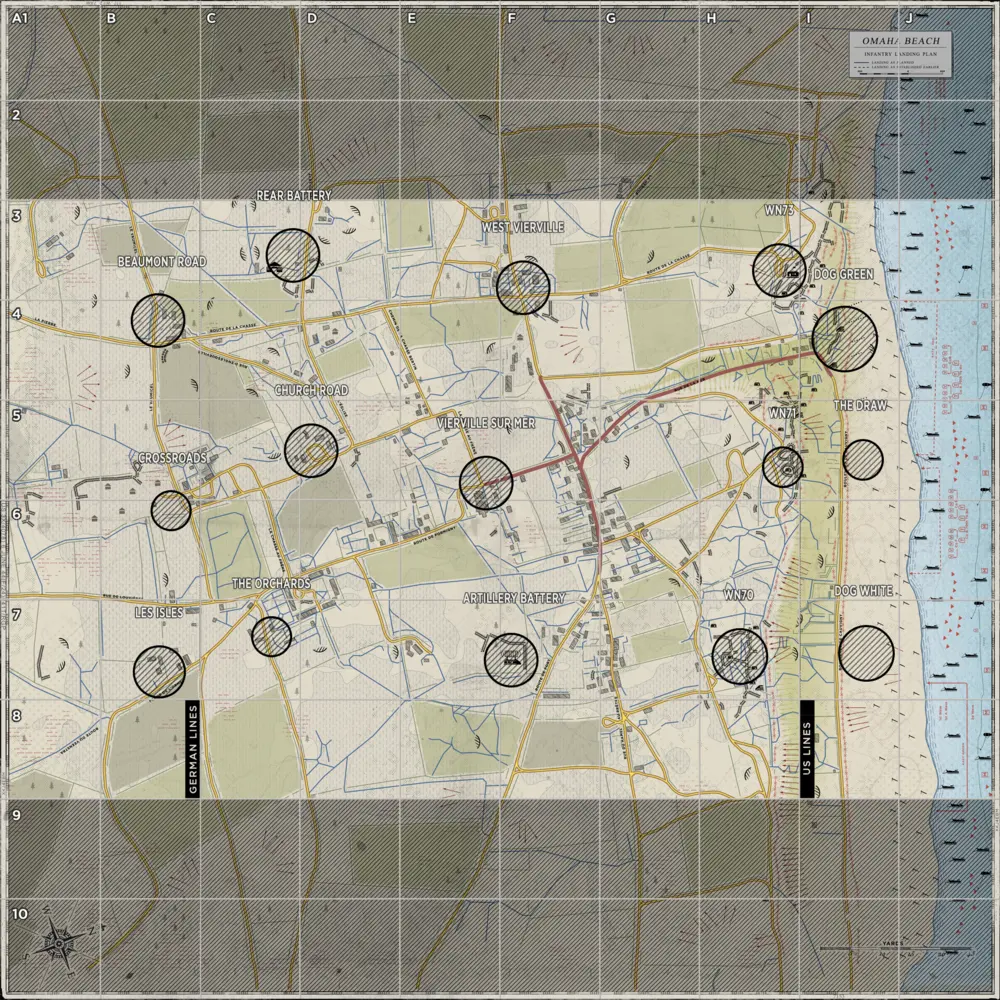
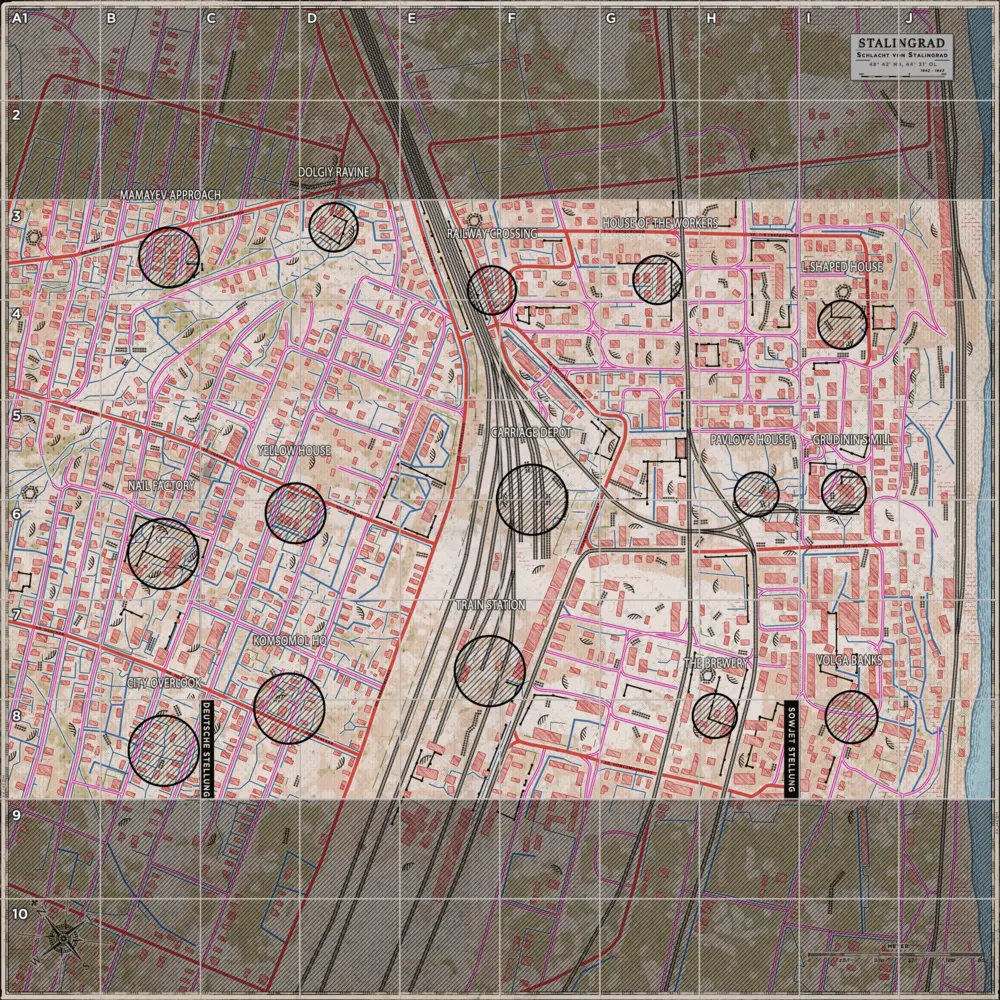
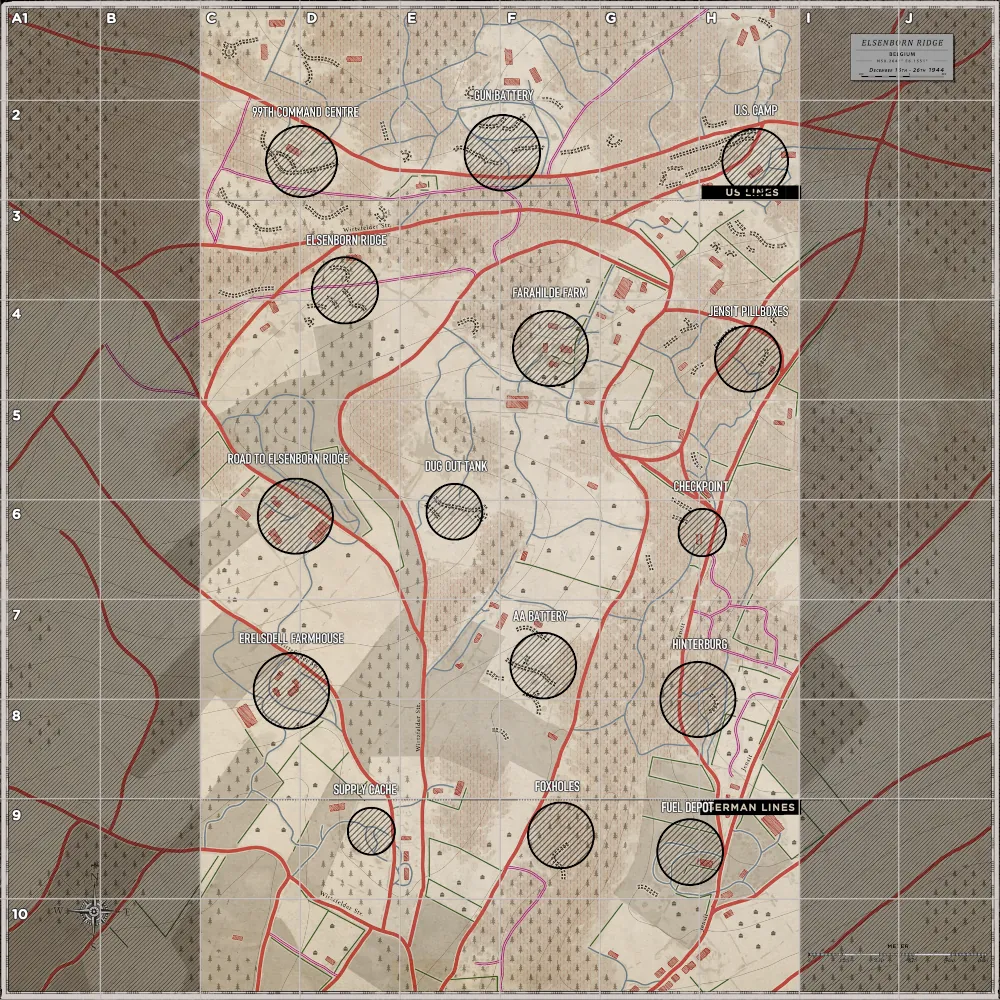
    Capturing: Progress counts only inside the strongpoint - no capture weight is added from the ground outside the circle, so commit to the strongpoint itself in this mode.

  • Skirmish - A smaller, faster format with fewer caps and tighter fights on a reduced slice of the map.

    Win condition: still driven by manpower and holding objectives, but on a quicker timeline - check the server’s mode card for player counts and rules.

    Spawns: Frontline garrisons are part of this mode’s toolbox (see spawns below), unlike the standard large-scale Warfare/Offensive flow.

Comms - mic and why it matters

Hell Let Loose is built around squads and command channels. Text chat is available on PC, but not on console.

  • Use a microphone when you can, but avoid overloading squad voice chat with constant chatter.
  • Be mindful of voice volume: this setting increases mic gain and can cause severe peaking, making you harder to understand in-game.
  • Default PC voice keys: V = proximity chat, C = squad chat, X = command chat.
  • If you are an Officer, use command comms to coordinate with other squad leaders and mark enemy spawn points or vehicles.

Spawns - garrisons, OPs, and frontline garrisons

Garrisons and Outposts (OPs) are how your team keeps people in the fight. Officers and Commanders place them with support from teammates and supplies.

  • Garrisons - This is your bread and butter, the main team spawn point. They must be placed in valid territory: either the blue zone or the first two red sectors closest to the blue zone. These require 50 supplies in blue territory or 100 supplies in red territory to build, and can be built by a Commander, Officer, Artillery Observer, or Spotter. If an enemy is within 100m of a red-zone garrison, it cannot be spawned on; in blue zones this is reduced to about 15m. Garrisons can be destroyed by large explosions or by enemy combatants holding the action button on them. Note: a long burn (a manual garrison takedown that takes a long time) usually means the garrison is deep behind enemy lines, farther back than the first two red sectors. Best practice is the pyramid method: build three garrisons around an objective in a triangle so your team has backups if territory is lost, and alternate spawn options if a bombing run hits center objective.
  • Outposts (OPs) - Squad-level spawns, faster to put down and easier to hide, but easier to destroy. Same broad idea: valid ground, not too close to enemies, and placed so your squad can re-engage quickly without feeding a spawn camp.
  • Frontline garrisons - These show up in Skirmish only. They are not tethered by the 100m or 200m threshold regular garrisons are held to. Instead, they can be placed fairly close together and functionally sit almost in the middle ground between outposts and garrisons.

Classes & loadouts

Browse kits by class and faction. Use the filter to narrow the list by role name or anything in the loadout (satchel, STG, smoke, supplies, and more). More factions added as data is verified.

Maps

Maps Let Loose (Made by Winston) — Interactive tac-map tool for Hell Let Loose: explore default spawns, sectors, strongpoints, and overlays; draw and annotate on tactical maps for planning and callouts.

Hürtgen Forest

The Battle of the Hürtgen Forest (1944–45) saw the U.S. First Army fight through dense woods and fortifications on the German–Belgian border—one of the longest and costliest American campaigns in Northwest Europe.

Hürtgen Forest key art
Overview / key art
Hürtgen Forest tactical map
Tactical map

Sainte-Marie-du-Mont

Behind Utah Beach, Sainte-Marie-du-Mont was part of the Normandy fighting in June 1944 as U.S. airborne and seaborne troops cleared the Cotentin and linked up inland.

Sainte-Marie-du-Mont key art
Overview / key art
Sainte-Marie-du-Mont tactical map
Tactical map

Foy

Foy sits near Bastogne, central to the Battle of the Bulge (December 1944–January 1945) when surrounded U.S. forces held the Ardennes before the counterattack east.

Foy key art
Overview / key art
Foy tactical map
Tactical map

Carentan

Carentan was fought over in June 1944 as U.S. forces pushed inland to join the Omaha and Utah beachheads—a key crossroads in the Normandy bocage.

Carentan key art
Overview / key art
Carentan tactical map
Tactical map

Sainte-Mère-Église

Sainte-Mère-Église was among the first towns liberated on D-Day; American paratroopers seized vital roads behind Utah Beach during Operation Neptune.

Sainte-Mère-Église key art
Overview / key art
Sainte-Mère-Église tactical map
Tactical map

Purple Heart Lane

The name evokes the grinding Normandy advance toward Saint-Lô in the summer of 1944, where hedgerows and German defenses made every lane costly for Allied infantry.

Purple Heart Lane key art
Overview / key art
Purple Heart Lane tactical map
Tactical map

Omaha Beach

On 6 June 1944, Omaha Beach was the hardest of the Allied landings—U.S. troops stormed bluffs and bunkers against a heavily prepared German defense.

Omaha Beach key art
Overview / key art
Omaha Beach tactical map
Tactical map

Utah Beach

The westernmost U.S. D-Day beach, Utah saw the 4th Infantry Division land on 6 June 1944, then drive inland to join American paratroopers holding the Cotentin.

Utah Beach key art
Overview / key art
Utah Beach tactical map
Tactical map

Hill 400

Hill 400 (Bergstein) was contested in the Hürtgen Forest fighting of late 1944—an exposed height both sides attacked and counterattacked for control of the Roer river line.

Hill 400 key art
Overview / key art
Hill 400 tactical map
Tactical map

Kursk

Operation Citadel (July–August 1943) produced the Battle of Kursk—the largest tank engagement of the war—as Germany tried to pinch off a Soviet salient on the Eastern Front.

Kursk key art
Overview / key art
Kursk tactical map
Tactical map

Stalingrad

The Battle of Stalingrad (1942–43) was a turning point on the Eastern Front: months of urban and riverside combat ended in encirclement and surrender of the German Sixth Army.

Stalingrad key art
Overview / key art
Stalingrad tactical map
Tactical map

Remagen

In March 1945, U.S. forces captured the Ludendorff Bridge at Remagen, gaining an unexpected Rhine crossing that accelerated the Allied drive into Germany.

Remagen key art
Overview / key art
Remagen tactical map
Tactical map

Driel

Polish paratroopers dropped at Driel during Operation Market Garden (September 1944), trying to reinforce the British bridgehead at Arnhem on the Lower Rhine.

Driel key art
Overview / key art
Driel tactical map
Tactical map

El Alamein

The Second Battle of El Alamein (October–November 1942) broke Axis momentum in North Africa; Montgomery’s Eighth Army pushed Rommel back from Egypt toward Tunisia.

El Alamein key art
Overview / key art
El Alamein tactical map
Tactical map

Kharkov

Kharkov changed hands several times; the Third Battle of Kharkov (February–March 1943) was a major German counteroffensive after Stalingrad that briefly retook the city.

Kharkov key art
Overview / key art
Kharkov tactical map
Tactical map

Mortain

The German Operation Lüttich (August 1944) aimed at Mortain tried to cut off Patton’s breakout; it failed and helped set up the Falaise Pocket encirclement.

Mortain key art
Overview / key art
Mortain tactical map
Tactical map

Elsenborn Ridge

On the northern shoulder of the Bulge, U.S. units held Elsenborn Ridge against 6th Panzer Army attacks in the Ardennes, blunting the German winter offensive.

Elsenborn Ridge key art
Overview / key art
Elsenborn Ridge tactical map
Tactical map

Tobruk

The siege of Tobruk (1941) saw Commonwealth forces defend the Libyan port for months against Rommel’s Afrika Korps, a famous episode of the North African campaign.

Tobruk key art
Overview / key art
Tobruk tactical map
Tactical map

Smolensk

The Smolensk region saw major fighting in 1941 and 1943 on the road to Moscow—large-scale Soviet–German battles for a key rail and road hub on the Eastern Front.

Smolensk key art
Overview / key art
Smolensk tactical map
Tactical map

Tips

From the Draft Haus community — tactics and perspective from regulars on Armor Hub’s home server.

ARMOR HUB

COMING IN 2026

Experience the next chapter of Hell Let Loose with Vietnam-era armored warfare

FIELD BRIEF // LAUNCH WINDOW HLL-VN-2026-███

Check back SOON

Vietnam-Era Tanks
Jungle Warfare
New Combat Mechanics

Newest details on Vietnam